
Summary: If you’re looking to send a calendar invite in Outlook, you may wonder why Outlook is a good choice. This article will explore how to send calendar invitation in Outlook. And provide a step-by-step guide on how to do so.
Outlook is one of the most popular email clients on the market. It’s free, easy to use, and has a wide range of features. One of Outlook’s most powerful features is its calendar. You can use Outlook to send invitations for events, meetings, and more.
Now, we’ll explore how to send a meeting invite in Outlook and a list of steps you can take to get started.
Contents
- 1 Reasons to Send a Calendar Invite in Outlook
- 2 How to Send Calendar Invite Outlook
- 2.1 Step 1: Visit the Calendar Icon for Send a Calendar Request in Outlook
- 2.2 Step 2: How to Send an Invite on Outlook for a Meeting
- 2.3 Step 3: Click to add your participants
- 2.4 Step 4: Schedule the Start and End Time
- 2.5 Step 5: Set a location for the meeting
- 2.6 Step 6: Send the Invitation to the Participants
- 3 How to Send Meeting Invite in Outlook for Teams
- 4 How to Follow Up With Your Guests After Send a Calendar Invite in Outlook
Reasons to Send a Calendar Invite in Outlook
There are many reasons someone might want to send a calendar invite through Outlook. For example, some people use it to send invitations when they wish to contact several people at once. Another common use for Outlook is to send announcements about events.
Many people might think the best way to inform their coworkers about an important meeting is by sending out a calendar invite. However, there are other ways to do this as well. One way is to share the information with coworkers in a message or chat for vacation. It can be an easy and informal way to communicate with them and let them know about the meeting.
How to Send Calendar Invite Outlook
If you want to send a calendar invite in Outlook, you can take a few different steps. The first is to open Outlook and go to the Calendar section. Additionally, you can select a date and time range or create a new calendar from there. Once you’ve selected or created your calendar, it’s time to send your invite.
First, click the “Invites” tab at the top of the calendar to send an invite.
Moreover, we also describe all the steps to send a meeting invite in Outlook. If you face the delay sending email in Outlook you can read this post.
Step 1: Visit the Calendar Icon for Send a Calendar Request in Outlook
- You will find the calendar icon in the bottom left corner of your Outlook inbox.
- Click on the icon, and the calendar window will open.
- If you use Outlook with a browser other than Google Chrome and a more recent version, you may see the calendar icon near the top-left corner of your inbox instead.
- The New Items drop-down menu is on the top left of your Outlook inbox.
- Click the New Items button, then click Meeting.
Sometimes, users face the issue of cannot display the folder in Outlook. To fix this error, you can read this post.
Step 2: How to Send an Invite on Outlook for a Meeting
- You’ll need to organize your invitation to get the most out of your calendar event. The first and foremost step in this process is to enter your meeting details accurately.
- Give your meeting a title that will indicate its topic. It will appear in the subject line of your email message.
Step 3: Click to add your participants
- Locate and click on the Required field.
- When you visit the required field, Outlook shows the lists of some of your recent email addresses. Select the email address of any contacts you like to invite.
- If you don’t locate the contacts you’re looking for, click directly on the Required button (not the filled field).
- Outlook will prompt a new dialog box with your Address Book when you click the Required option.
- Click each contact in your address book, and then tap Required after it. Continue this process until you’ve added all of the required attendees.
- You can offer people the choice of selecting Optional where needed instead of Required.
- To finish the process click on the OK button.
Step 4: Schedule the Start and End Time
- Click on the Calendar icon next to Start Time while defining your meeting time.
- Select the start and end date for your meeting and the indicated hour.
- Here, you can decide whether this function will be a recurring meeting. You can also check the box for an all-day event.
Step 5: Set a location for the meeting
- Click the location button, choose the room you want from the Select Room window, and click OK.
Step 6: Send the Invitation to the Participants
- After you fill in the required fields, you can send the meeting invitation by clicking on the Send button on the top-left portion of the page.
How to Send Meeting Invite in Outlook for Teams
Step 1: For Outlook Desktop App Users
1. Open up Microsoft Outlook and go to the calendar view.
2. Select New Teams Meeting at the top of your screen.

3. Be sure to add your invitees to the mandatory or optional fields. You may also invite entire contact groups (formerly known as distribution lists).
4. Add your meeting subject, place, time, and end time.
5. Compose the message.
6. Hit the send button.
Step 2: For Outlook Web App Users
1. At the bottom-right of the screen, select Settings to access the settings menu and choose View All Outlook Settings.
2. Select Calendar > Events and invitations > Add online meetings to all meetings.
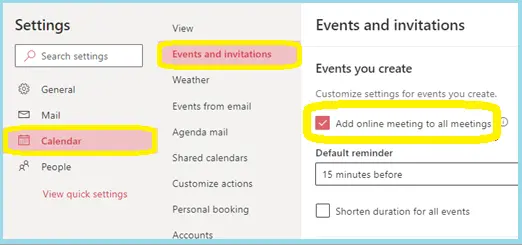
3. Hit the Save button.
How to Follow Up With Your Guests After Send a Calendar Invite in Outlook
The perfect goal would be for your invitees to respond instantly to one of the standard response choices: Yes, No, or Maybe.
Unfortunately, it’s not uncommon for situations to not go according to plan.
A person receives over 80 emails daily, which isn’t a surprise. It may account for a few that find their way into the junk folder (accidentally or otherwise)!
Here’s an example of the appropriate and even wise way to execute a follow-up communication when, after about 24 hours, if you haven’t received a response of your own. You can resend a calendar invite in Outlook. Sometimes, this issue causes by when you do not send a secure email in Outlook.
Make sure to follow these follow-up instructions:
- Okay, this information does not indicate when you should submit it, but it is worth mentioning nonetheless: Try stating it directly in the subject line that you’re looking for RSVPs. Subject lines with RSVP or Response Required are more likely to be read.
- It is hard to wait, but give your guests at least a day to consider their presence on your email account. Additionally, rearrange their calendars before you start following up regarding the invitation. Don’t follow up with an invitation until a full business day has gone.
- To notify interested attendees of event details, send a follow-up message the day before or twenty-four hours beforehand. If you want it sent hours before the event begins, writing will remind your recipients on the day of the event.
- Showing gratitude is also a good touch. It’ll show your business associates or potential clients you value their time.
Conclusion
In conclusion, there are several ways to send a calendar invite in Outlook. Using the methods outlined above, you should be able to send a calendar request in Outlook on time. I hope you can easily send a calendar invite as an attachment in Outlook. Now, you should have no trouble sharing your invitations with your audience.


